By Stacia · Updated March 2026 · Acne & Breakout Treatments
This post contains affiliate links. I may earn a small commission at no extra cost to you. I only recommend products I personally use and believe in.
A breakout is not just an aesthetic inconvenience — it is your skin’s inflammatory response to a specific trigger, and how you treat it in the first 24 to 72 hours determines whether it heals cleanly or leaves a mark that takes months to fade.
Most people’s instinct is to pick, squeeze, or dry out a pimple with a harsh spot treatment. All three approaches make things worse. Picking introduces new bacteria, damages the follicle wall, and almost always causes post-inflammatory hyperpigmentation (PIH) — the dark or red marks left after a blemish heals. Harsh drying agents strip the surrounding skin and trigger rebound oil production.
What actually clears a breakout fast, with minimal scarring and redness, is a targeted protocol that addresses three things simultaneously: the bacteria driving the infection, the inflammation causing swelling and redness, and the skin barrier integrity needed to heal without damage.
This post covers every product and technique I use — with the science behind each one.
Step 1: Immediately Disinfect With Hypochlorous Acid
Tower 28 SOS Daily Rescue Facial Spray — or the Amazon Dupe
Hypochlorous acid (HOCl) is one of the most clinically underrated skincare ingredients available without a prescription. It is the same compound your white blood cells produce to destroy pathogens — a natural antimicrobial that kills acne-causing bacteria (C. acnes) without disrupting the skin’s microbiome or causing irritation.
Unlike benzoyl peroxide, which bleaches fabric, strips skin, and can cause dryness and peeling, hypochlorous acid is so gentle it is used in wound care and post-procedure recovery. It reduces bacterial load on the skin’s surface, calms active inflammation, and speeds healing — all at once.
The Tower 28 SOS Spray is the cult-favourite version. The Amazon dupe contains the same active compound at an equivalent concentration for a fraction of the price.
How to use: Spray directly onto a clean face — or onto a specific blemish — immediately after cleansing. Let it air dry. Use morning and evening, and any time throughout the day when skin feels irritated or reactive. No rinsing needed.
→ Shop Hypochlorous Acid Facial Spray on Amazon
Step 2: Apply a Targeted Acne Spot Gel
Acne Spot Control Gel
After the hypochlorous acid has dried, apply a targeted spot treatment to any active blemishes. A well-formulated acne spot gel typically contains salicylic acid and/or niacinamide — ingredients that work inside the pore to reduce sebum, exfoliate the blockage causing the bump, and calm the inflammatory response driving redness.
The key is thin, targeted application — not a thick layer across the whole face. You want the active ingredients concentrated directly on the blemish, not spread across surrounding healthy skin where they cause unnecessary dryness.
How to use: Apply a small amount directly to each active blemish after your hypochlorous acid spray. Allow to absorb before the next step. Use evening only if combining with a retinoid or BHA in your routine.
→ Shop Acne Spot Control Gel on Amazon
Step 3: Patch — Don’t Pick
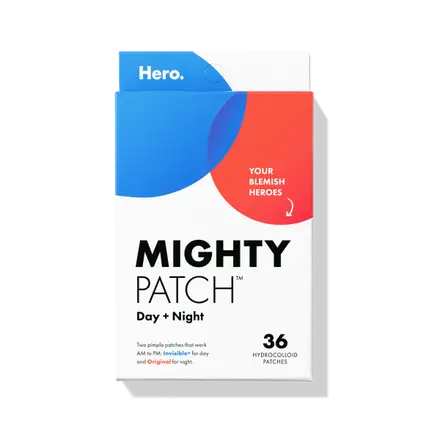
Hero Cosmetics Mighty Patch Original + Invisible
Pimple patches are not a gimmick. They are one of the most evidence-supported interventions for surface-level blemishes, and the Hero Cosmetics Mighty Patch line is the clinical benchmark.
Hydrocolloid patches work by creating an occlusive, moist healing environment over the blemish. This does two things simultaneously: it draws out the contents of a surface-level whitehead through osmotic pressure (the white gunk you see on the patch after wearing it overnight), and it creates a physical barrier that makes picking mechanically impossible while protecting the blemish from environmental bacteria.
The moist wound healing environment hydrocolloid creates has been extensively studied — it reduces healing time, decreases inflammation, and significantly lowers the risk of post-inflammatory hyperpigmentation compared to open-air healing.
Which patch for which blemish:
Mighty Patch Original (night use): The thicker, more absorbent version. Use overnight on any blemish that has come to a surface — whiteheads, pustules, or anything with visible contents. You will often wake up to a white-filled patch and a significantly flatter blemish. Not designed to be invisible under makeup — use for overnight treatment only.
Mighty Patch Invisible (daytime): Ultra-thin, matte finish that disappears under makeup. Apply in the morning after your skincare routine, before primer. The Hero Invisible patch is specifically engineered to be concealer-friendly — you can apply makeup directly over it and it will not lift or bubble. This is the daytime equivalent that lets you treat an active blemish while wearing a full face.
→ Shop Hero Mighty Patch Day + Night on Amazon
Step 4: Microdart Patches for Under-Skin Blemishes
Hero Cosmetics Mighty Patch Microdart
Standard hydrocolloid patches only work on blemishes that have surfaced — they cannot reach a deep, under-skin nodule or blind pimple that has not yet come to a head. This is where microdart technology changes the protocol entirely.
The Hero Mighty Patch Microdart contains 173 self-dissolving microdarts made from hyaluronic acid and niacinamide. These microscopic needles penetrate the surface of the skin and deliver active ingredients directly into the blemish — targeting the infection site from the inside rather than waiting for it to surface.
Clinical data on Hero’s microdart patches shows the darts begin dissolving within two hours of application, delivering their payload of anti-inflammatory and pore-clearing ingredients into the dermal layer where a deep blemish lives. This accelerates the natural resolution of the blemish and reduces the likelihood of it developing into a large, inflamed nodule.
This is the patch for the blemish you can feel under your skin but cannot yet see — the ones that, left untreated, become the most painful and most likely to scar.
How to use: Apply to clean, dry skin over the area where you can feel an under-skin blemish. Press firmly for 30 seconds to ensure microdart contact. Wear for a minimum of 2 hours — overnight is ideal. Follow with the Original patch once the blemish begins to surface.
→ Shop Hero Mighty Patch Microdart on Amazon
Step 5: Ice Rolling for Inflammation
Ice Roller
Cryotherapy — the application of cold to reduce inflammation — is a clinically validated technique used in dermatology offices for everything from rosacea to post-procedure recovery. An ice roller brings the same principle home at a fraction of the cost.
Cold causes vasoconstriction — the narrowing of blood vessels — which immediately reduces the visible redness and swelling of an active blemish. It also numbs the area, reducing the tactile sensation that makes picking tempting. Additionally, the rolling motion provides mild lymphatic drainage, helping move stagnant fluid away from the inflamed area.
Studies on cryotherapy and acne show that cold application before extractions significantly reduces post-extraction redness, and that regular cold exposure can reduce sebum production over time by temporarily constricting sebaceous glands.
How to use: Store your ice roller in the freezer. Before applying any skincare, roll over your entire face for 1–2 minutes, spending extra time on any active or inflamed blemishes. Always roll on clean skin. Use morning and evening, or any time a blemish becomes particularly red or swollen. Never apply directly to broken or open skin.
Step 6: Red and Blue LED Light Therapy
Red + Blue + Infrared LED Mask
LED phototherapy is one of the few at-home skincare technologies with robust peer-reviewed clinical evidence behind it. The mechanism is well understood: different wavelengths of light penetrate the skin at different depths and trigger specific cellular responses.
Blue light (415nm) is absorbed by porphyrins — compounds produced by C. acnes bacteria. This absorption generates reactive oxygen species that destroy the bacterial cell wall from the inside, reducing the bacterial load driving active breakouts without any irritation to surrounding tissue. A clinical meta-analysis found blue light therapy reduced inflammatory acne lesions by an average of 64% over 8 weeks of consistent use.
Red light (633nm) penetrates deeper into the dermis, where it stimulates fibroblast activity and collagen production. For active breakouts, this translates to reduced inflammation and faster healing. For post-breakout recovery, red light accelerates the fading of post-inflammatory hyperpigmentation by supporting skin cell renewal in the affected area.
Near-infrared light penetrates deepest of all — into the subcutaneous tissue — where it promotes cellular energy production (ATP synthesis), reduces deep-seated inflammation, and supports tissue repair at a structural level.
Used 4–5 times per week, a combined red, blue and infrared mask significantly accelerates both the clearing of active blemishes and the healing of PIH left behind. It is the tool that bridges the gap between treating today’s breakout and recovering the skin that was there before it.
How to use: Use on clean, dry skin after ice rolling and before applying serums or patches. 10-minute sessions, 4–5 times per week. Blue light priority for active breakouts; red and infrared priority for healing and PIH recovery.
→ Shop Red + Blue + Infrared LED Mask on Amazon
Step 7: Concealing Without Making It Worse
The Best Concealer for Active Blemishes
Standard concealers applied directly to an active blemish are often comedogenic — they clog the pore further, extend the lifespan of the blemish, and make everything worse by the end of the day. The right concealer for an active breakout needs to be non-comedogenic, have a formula thin enough to sit on top of a patch without lifting, and provide enough coverage to neutralise redness without looking cakey.
The concealer linked below is specifically formulated for blemish-prone skin — non-comedogenic, buildable coverage, and designed to work in conjunction with patches. Apply over your Hero Invisible patch with a clean brush or sponge, tapping rather than dragging to avoid disturbing the patch seal.
Application tip: Always colour-correct first if you have significant redness — a green colour corrector underneath your concealer neutralises the red tone at the source, meaning you need far less concealer on top and the result looks more natural and lasts longer.
→ Shop Best Concealer for Blemishes on Amazon
Step 8: Environmental Controls
The Two Habits That Silently Make Breakouts Worse
Even the most sophisticated product routine is undermined by two environmental factors most people overlook entirely.
The Pillowcase Problem
You press your face against your pillowcase for 6–8 hours every night. A standard cotton pillowcase accumulates sebum, dead skin cells, residual skincare product, and environmental bacteria within 24 hours of use — and transfers all of it back onto freshly cleansed skin, directly into pores, every single night.
Silk pillowcases have two advantages over cotton: the tightly woven surface is less hospitable to bacterial accumulation, and the smooth texture creates significantly less friction against the skin — reducing the mechanical irritation that can trigger or worsen a breakout. Change your pillowcase every 2–3 days regardless of material. A silk case changed every 3 days is substantially cleaner than a cotton case changed weekly.
→ Shop Silk Pillowcase on Amazon
The Towel Problem
Bath towels are one of the most bacteria-laden surfaces in any bathroom, accumulating mould, bacteria and yeast between washes. Patting a wet, freshly-cleansed face with a shared bathroom towel reintroduces exactly what you just washed off. Single-use paper hand towels — specifically unscented, undyed options like Kleenex — eliminate this entirely. One box next to your sink costs very little and removes one of the most overlooked contamination sources in any skincare routine.
The Complete Breakout Protocol
As Soon as You Notice a Blemish:
- Ice roll the area for 1–2 minutes to reduce initial inflammation
- Cleanse with a gentle, barrier-safe cleanser
- Pat dry with a single-use paper towel
- Spray hypochlorous acid — let air dry
- Apply acne spot gel directly to the blemish
- If under-skin: apply Microdart patch for minimum 2 hours
- If surfaced: apply Original Mighty Patch overnight
- LED mask session — blue light priority
Morning Routine During a Breakout:
- Gentle cleanse
- Dry with Kleenex paper towel
- Ice roll
- Hypochlorous acid spray — air dry
- Apply Hero Invisible patch over any active blemishes
- Lightweight non-comedogenic moisturiser
- SPF 30+ — non-negotiable (UV exposure worsens PIH dramatically)
- Colour correct and conceal over patches as needed
Evening Routine During a Breakout:
- Double cleanse
- Dry with Kleenex paper towel
- Hypochlorous acid spray
- Acne spot gel on active blemishes
- LED mask — 10 minutes
- Lightweight moisturiser
- Original Mighty Patch on any surfaced blemishes overnight
- Fresh pillowcase
What to Expect — and What Not to Do
Do not pick. Mechanical disruption of a blemish ruptures the follicle wall, spreads the bacterial infection into surrounding tissue, and almost always results in PIH. No exception to this rule.
Do not over-dry. Stripping the skin with alcohol-based toners or harsh spot treatments compromises the barrier, triggering rebound sebum production that extends the breakout cycle.
Do not skip SPF. UV exposure is the single biggest driver of PIH darkening. A blemish that fades in 4 weeks with daily SPF will take 4–6 months without it. This is non-negotiable.
Timeline to expect: A surface blemish treated with this protocol from the first sign — patch overnight, ice rolling, hypochlorous acid, LED — typically resolves in 3–5 days rather than the 7–14 days of an untreated blemish. Under-skin blemishes take longer: 5–10 days with microdart patches and LED therapy versus 2–3 weeks untreated.
Full Product List
- Hypochlorous Acid Facial Spray — first line of defence, antimicrobial
- Acne Spot Control Gel — targeted treatment for active blemishes
- Hero Mighty Patch Original + Invisible (Day + Night) — hydrocolloid patches
- Hero Mighty Patch Microdart — for under-skin, deep blemishes
- Ice Roller — inflammation and redness reduction
- Red + Blue + Infrared LED Mask — bacterial clearance + healing
- Best Concealer for Blemishes — non-comedogenic coverage
- Silk Pillowcase — environmental control, less friction
Affiliate disclosure: This post contains affiliate links. I may earn a small commission when you purchase through my links at no extra cost to you. I only recommend products I have personally tested and genuinely believe in. This is not medical advice — please consult a dermatologist if you have concerns about your skin.